Setup image and install tools for building your a KNX IP interface for ETS5 and 1-wire support.
Install Debian 10
Download and flash below image to a 2GB micro-SD card.
https://rcn-ee.net/rootfs/2020-04-09/flasher/bone-eMMC-flasher-debian-10.3-console-armhf-2020-04-09-2gb.img.xz
Now that you have the latest image of Angstrom loaded onto your micro-SD card slot, you'll need to flash it onto the on-board flash memory of the BeagleBone Black.
To start, make sure the BeagleBone Black is powered down, and unplugged from the power source.
Now, insert the micro-SD card into the slot on the back of the BeagleBone Black. It should snap into place.

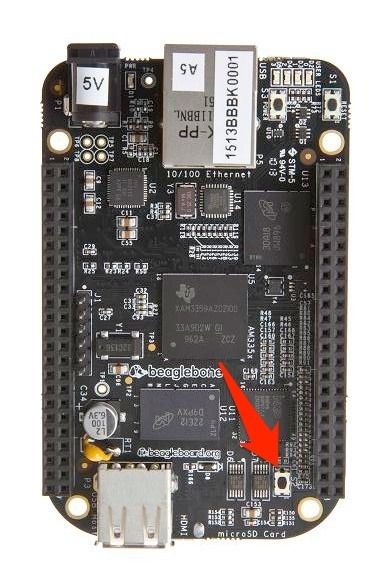
Hold the "User Boot" button down, and then plug in the power (USB or 5V adapter). Keep holding down the button until you see the bank of 4 LED's light up for a few seconds. You can now release the button.
It will take anywhere from 30-45 minutes to flash the image onto the on-board chip. Once it's done, the bank of 4 LED's to the right of the Ethernet will all turn off. You can then power down your BeagleBone Black. Remove card and place Cape back, power on.
Setup image
# Look for bbgw's IP address in DHCP and login using SSH
ssh 192.168.178.122

Pre-authentication banner message from server:
| Debian GNU/Linux 10
|
| rcn-ee.net Debian Console Image 2020-04-09
|
| Support: http://elinux.org/BeagleBoardDebian
|
| default username:password is [debian:temppwd]
|
End of banner message from server

# Set password for root user
$ sudo passwd root

$ sudo useradd -m -s /bin/bash -c "Full Name" -U user
$ sudo passwd user
$ sudo usermod -aG sudo,dialout user

# Logout/in
$ sudo userdel --remove debian

# Remove banners
$ sudo rm /etc/issue*

cat <<EOF >update.sh
#!/bin/bash
sudo apt-get update
sudo apt-get upgrade
sudo apt-get autoclean
sudo apt-get clean
sudo apt-get autoremove
> ~/.bash_history
history -c
dpkg -l | awk '/^rc/ {print $2}' | xargs sudo dpkg --purge
EOF

$ chmod +x install.sh
$ ./update/sh

$ sudo dpkg-reconfigure tzdata
$ sudo reboot
Install and configure the 1-wire daemon
$ sudo apt-get install owserver owhttpd owfs
$ sudo vi /etc/owfs.conf

# Create 1wire mountpoint
$ sudo mkdir /mnt/1wire

# Replace line with „FAKE“ with" these:
server: i2c = dev/i2c-2:0
server: i2c = dev/i2c-3:0
server: i2c = dev/i2c-4:0
server: i2c = dev/i2c-5:0

# Edit settings for owfs
mountpoint = /mnt/1wire
allow_other

$ sudo service owserver start
$ sudo service owhttpd start

# Browse to http://[IP]:2121 click „bus.0“ you should see the onboard Temperature sensor „28.xxxxxxx“

$ cat /mnt/1wire/28.FFAB96641401/temperature
28.1875
Install and configure the knxd daemon.
$ sudo apt-get install knxd knxd-tools

# Set static IP address and defince multicast routes
$ sudo vi /etc/network/interfaces

iface eth0 inet static
    address 192.168.2.30
    netmask 255.255.255.0
    gateway 192.168.2.254
    post-up route add -net 224.0.23.12 netmask 255.255.255.255 eth0
    pre-down route del -net 224.0.23.12 netmask 255.255.255.255 eth0

$ cat /etc/resolv.conf
nameserver 192.168.2.254
nameserver 8.8.8.8

$ sudo apt purge connman
$ sudo reboot

# Testing params
$ sudo service knxd stop
$ knxd --eibaddr=1.1.200 --client-addrs=1.1.201:8 -D -T -R -S -i --listen-local=/tmp/knx -t 1023 -b tpuart:/dev/ttyO2

# You can create the content of the ini file by running the following command.
$ /usr/lib/knxd_args --eibaddr=1.1.200 --client-addrs=1.1.201:8 -D -T -R -S --listen-local=/tmp/knx -t 1023 -b tpuart:/dev/ttyO2
[A.unix]
path = /tmp/knx
server = knxd_unix
systemd-ignore = false
[B.tpuart]
debug = debug-B.tpuart
device = /dev/ttyO2
driver = tpuart
[debug-B.tpuart]
trace-mask = 0x3ff
[debug-main]
trace-mask = 0x3ff
[debug-server]
name = mcast:knxd
[main]
addr = 1.1.200
client-addrs = 1.1.201:8
connections = server,A.unix,B.tpuart
debug = debug-main
systemd = systemd
[server]
debug = debug-server
discover = true
router = router
server = ets_router
tunnel = tunnel

Give permission to knxd
$ sudo usermod -a -G tty knxd
$ sudo usermod -a -G dialout knxd

$ sudo vi /etc/knxd.ini
[A.unix]
path = /tmp/knx
server = knxd_unix
systemd-ignore = false
[B.tpuart]
debug = debug-B.tpuart
device = /dev/ttyO2
driver = tpuart
[debug-B.tpuart]
trace-mask = 0x3ff
[debug-server]
name = mcast:knxd
[main]
addr = 1.1.200
client-addrs = 1.1.201:8
connections = server,A.unix,B.tpuart
systemd = systemd
[server]
debug = debug-server
discover = true
router = router
server = ets_router
tunnel = tunnel

$ sudo vi /etc/knxd.conf
# configuration for knxd.service
#KNXD_OPTS="-e 0.0.1 -E 0.0.2:8 -u /tmp/eib -b ip:"

# configuration for knxd.service using new configuration format in /etc/knxd.ini
# use only this line if you used knxd_args to convert your old startup options
KNXD_OPTS=/etc/knxd.ini

$ sudo service knxd restart

Publish 1-Wire temperature sensor values on bus
NOTE: you need to find your sensor ID and adjust script below (behind "/mnt/1wire/"
$ vi knxtemp.sh
#!/usr/bin/env python3
# knxtemp.py. This script sends the measured temperature as DPT9 to the KNX bus

import os
import struct

file=open('/mnt/1wire/28.FFAB96641401/temperature','r')
tmp = '{:.2f}'.format(float(file.read()))

def to_knx(value):

        def calc_exponent(float_value, sign):
            """Return float exponent."""
            exponent = 0
            significand = abs(int(float_value * 100))

            while significand < -2048 or significand > 2048:
                exponent += 1
                significand >>= 1

            if sign:
                significand ^= 0x7FF
                significand += 1

            return exponent, significand

        try:
            knx_value = float(value)

            sign = 1 if knx_value < 0 else 0
            exponent, significand = calc_exponent(knx_value, sign)

            return (sign << 7) | (exponent << 3) | (
                significand >> 8
            ), significand & 0xFF
        except ValueError:
            print("Could not serialize %s", value)

byte_str = ""
for x in to_knx(tmp):
  byte_str += hex(x)+ " "

file.close()
os.system('knxtool groupwrite ip:localhost 4/5/1 '+byte_str)
Configure crontab
# Run script every minute
$ crontab -e
# m h  dom mon dow   command
* * * * * /home/user/knxtemp.sh
Configure Home Assistant
knx:
  ...

  sensor:
    - name: Temperatuur BeagleBone
      state_address: "4/5/1"
      type: temperature


